
 SpringBoot初识
# SpringBoot框架
# 1. 简介
Spring Boot是Spring团队在2014年推出的全新框架(不是新的MVC框架),它的目的就是简化Spring项目的开发过程,简化Spring配置流程,可以使用少量代码快速创建Spring应用程序。 SpringBoot的优点
- 可以创建独立的Spring应用程序
- 内置了Servlet容器 如Tomcat Jetty or Underttow(不需要部署war包)
- 提供了固定的starter依赖来简化构建配置
- 可以自动配置Spring 和 第三方框架
- 提供了生产级别的功能 监控 健康检查 外部化配置
- 没有代码的生成 不需要配置XML
- 为spring cloud 提供入门
SpringBoot的缺点
- 集成度过高 对于了解底层不容易
- 由于版本迭代速度较快 一些模块改动很大
- 由于不用自己做配置 报错时比较难定位
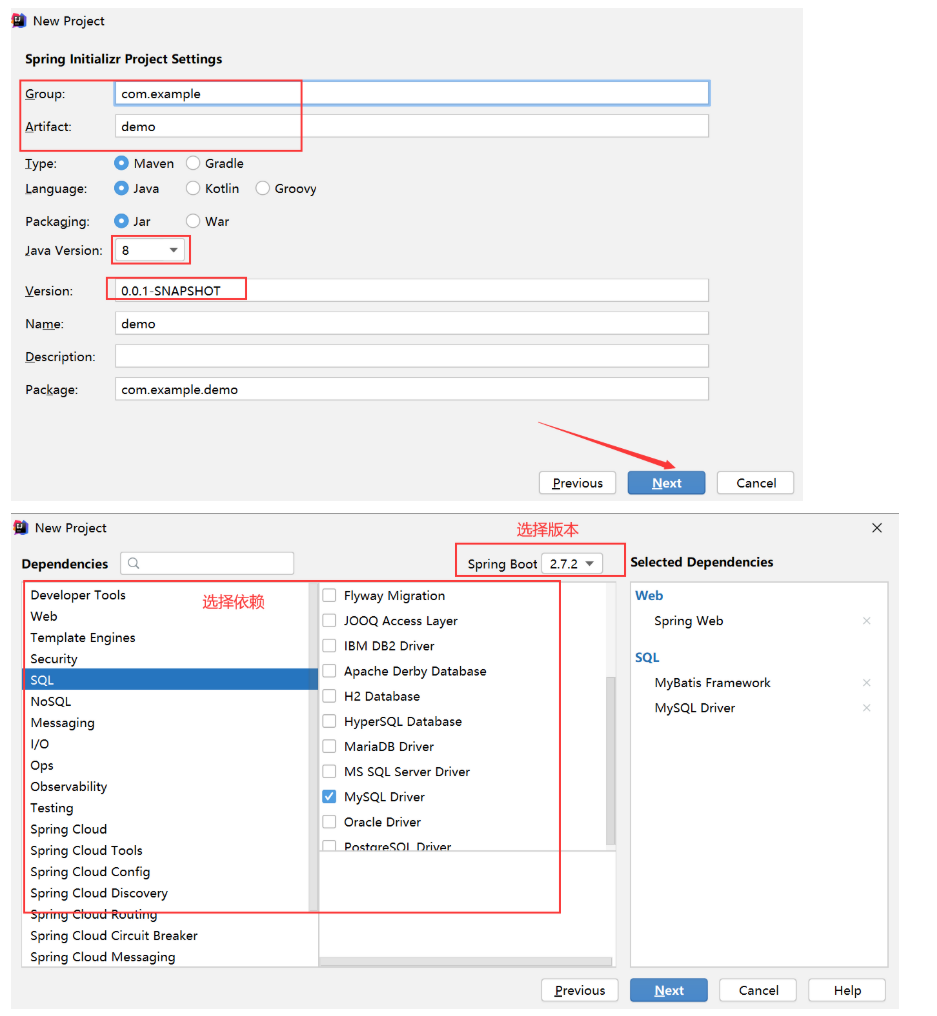
# 2. 开发SpringBoot 入门程序
- 可以在https://start.spring.io/网站上创建
- 使用IDEA提供的Spring Initializr工具创建
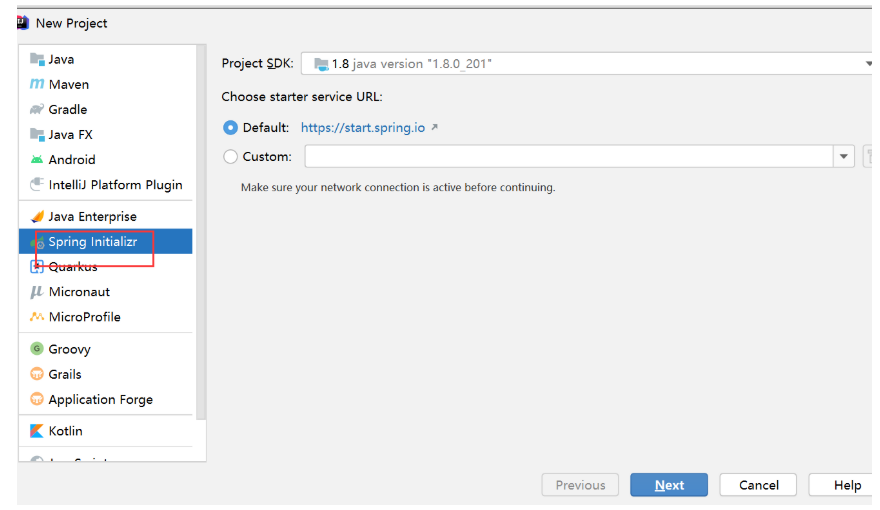
- 手动创建 书写
- JDK8+
- IDE
# 3. 修改Servlet容器端口 contextPath
- 在src/main/resources下创建application.properties(application.yml/application.yaml)文件
# localhost:9090/boot/hello?name=Spring
server.port=9090
server.servlet.context-path=/boot
2
3
# 4. Spring Boot 替换Servlet容器
排除Tomcat容器 引入Jetty依赖
<dependency>
	<groupId>org.springframework.boot</groupId>
	<artifactId>spring-boot-starter-web</artifactId>
	<!-- exclusions: 排除传递依赖 -->
	<exclusions>
		<exclusion>
			<groupId>org.springframework.boot</groupId>
			<artifactId>spring-boot-starter-tomcat</artifactId>
		</exclusion>
	</exclusions>
</dependency>

<!-- 导入Jetty -->
<dependency>
	<groupId>org.springframework.boot</groupId>
	<artifactId>spring-boot-starter-jetty</artifactId>
</dependency>
2
3
4
5
6
7
8
9
10
11
12
13
14
15
16
17
# 5. SpringBoot的默认数据源
- Spring Boot 1.0:tomcat-jdbc
- Spring Boot 2.0:HikariCP
- 整合JDBC的starter:spring-boot-starter-jdbc
# 6. SpringBoot 整合MyBatis
- Spring官方没有提供与MyBatis整合Starter
- MyBatis自己提供可以一个Starter:mybatis-spring-boot-starter
# 7. 创建SpringBoot项目
<parent>
	<groupId>org.springframework.boot</groupId>
	<artifactId>spring-boot-starter-parent</artifactId>
	<version>2.6.7</version>
</parent>

<dependencies>
	<dependency>
		<groupId>org.springframework.boot</groupId>
		<artifactId>spring-boot-starter-web</artifactId>
	</dependency>

	<dependency>
		<groupId>org.mybatis.spring.boot</groupId>
		<artifactId>mybatis-spring-boot-starter</artifactId>
		<version>2.1.4</version>
	</dependency>

	<dependency>
		<groupId>mysql</groupId>
		<artifactId>mysql-connector-java</artifactId>
	</dependency>

	<dependency>
		<groupId>org.projectlombok</groupId>
		<artifactId>lombok</artifactId>
		<optional>true</optional>
	</dependency>

</dependencies>
2
3
4
5
6
7
8
9
10
11
12
13
14
15
16
17
18
19
20
21
22
23
24
25
26
27
28
29
30
server:
	port: 8080
	servlet:
		context-path: /

spring:
	datasource:
		driver-class-name: com.mysql.cj.jdbc.Driver
		#    ///: 表示默认连接localhost:3306
		url: jdbc:mysql:///et2203?serverTimezone=UTC
		username: root
		password: root

mybatis:
	type-aliases-package: com.etoak.entity
	mapper-locations: classpath:mybatis/**/*.xml
	#  Sql打印到控制台
	configuration:
		log-impl: org.apache.ibatis.logging.stdout.StdOutImpl
2
3
4
5
6
7
8
9
10
11
12
13
14
15
16
17
18
19
# 8. 整合PageHelper
PageHelper提供了与SpringBoot 整合的Stater
<!-- pagehelper starter -->
<dependency>
  <groupId>com.github.pagehelper</groupId>
  <artifactId>pagehelper-spring-boot-starter</artifactId>
  <version>1.4.1</version>
</dependency>
2
3
4
5
6
@GetMapping("/list")
public PageVO<Student> getList(@RequestParam(required = false, defaultValue = "1") int pageNum,
							   @RequestParam(required = false, defaultValue = "10") int pageSize,
							   Student student) {
	PageHelper.startPage(pageNum, pageSize);
	List<Student> studentList = studentMapper.getStudent(student);
	PageInfo<Student> info = new PageInfo<>(studentList);
	return new PageVO<>(pageNum, pageSize, info.getList(), info.getTotal());
}
2
3
4
5
6
7
8
9
# 9. Spring工厂加载机制
# 1. JDK SPI
SPI全称Service Provider Interface,是Java提供的一套用来被第三方实现或者扩展的接口,它可以用来启用框架扩展组件和替换组件,SPI的作用就是为这些被扩展的API寻找服务实现,简单来说就是可以使用SPI来解耦,实现插件的自由插拔
# 2. Spring SPI
Spring框架从3.2版本开始提供了SpringFactoriesLoader工厂的加载机制,类似于Java提供的SPI机制,Spring利用这种机制实现了Spring Bean的自动配置。
# 3. SpringFactoriesLoader工厂的加载机制的默认约定
- 他是Spring框架内部的通用工厂加载机制
- 加载classpath下的META-INF/spring.factories文件,并实例化文件的中类型
- 文件内容格式必须是Properties格式(k=v),key必须是接口或类的全限定名称(包名+类名)value可以使单个值,可以是使用逗号分隔的多个值例如:example.MyService=example.MyServiceImpl1,example.MyServiceImpl2
# 4. SpringBoot的自动配置
- Spring Boot自动配置主要是通过Spring工厂加载机制实现的
- 启动类上的@SpringBootApplication注解包含了三个注解:@SpringBootConfiguration、@EnableAutoConfiguration、@ComponentScan,其中最重要的注解就是@EnableAutoConfiguration
- @EnableAutoConfiguration注解导入一个AutoConfigurationImportSelector类型,这个类型实现了ImportSelector接口的selectImports()方法,在这个方法中使用Spring工厂加载机制加载classpath下META-INF文件夹下的spring.factories文件中以EnableAutoConfiguration为key的所有Value值(自动配置类),对这个类型中定义的Bean进行有条件的自动配置;
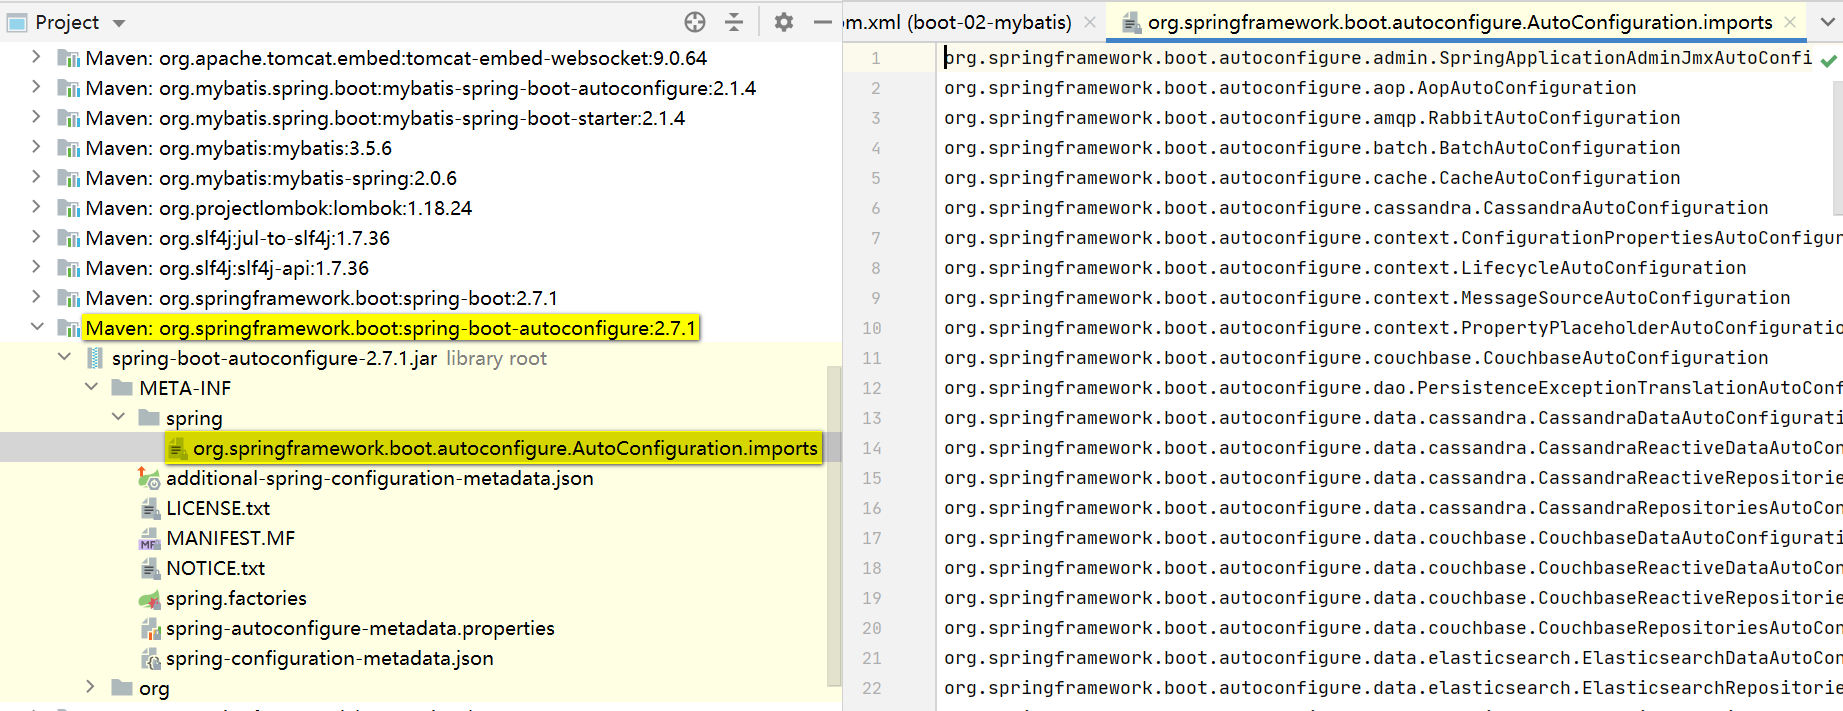
# 5. SpringBoot2.7.0 之后的自动配置实现方式
Spring Boot 2.7.0之后默认加载classpath下META-INF/spring文件夹下的org.springframework.boot.autoconfigure.AutoConfiguration.imports文件中的自动配置类
# 10. 编写MyBatis Strarter
# 1. 创建Maven工厂 引入依赖
<parent>
	<groupId>org.springframework.boot</groupId>
	<artifactId>spring-boot-starter-parent</artifactId>
	<version>2.6.7</version>
</parent>

<dependencies>
	<dependency>
		<groupId>org.mybatis</groupId>
		<artifactId>mybatis</artifactId>
		<version>3.5.7</version>
	</dependency>

	<dependency>
		<groupId>org.mybatis</groupId>
		<artifactId>mybatis-spring</artifactId>
		<version>2.0.7</version>
	</dependency>

	<dependency>
		<groupId>org.springframework.boot</groupId>
		<artifactId>spring-boot-starter-jdbc</artifactId>
	</dependency>

	<dependency>
		<groupId>org.springframework.boot</groupId>
		<artifactId>spring-boot-autoconfigure-processor</artifactId>
		<optional>true</optional>
	</dependency>

	<!-- @ConfigurationProperties annotation processing (metadata for IDEs) -->
	<dependency>
		<groupId>org.springframework.boot</groupId>
		<artifactId>spring-boot-configuration-processor</artifactId>
		<optional>true</optional>
	</dependency>
</dependencies>
2
3
4
5
6
7
8
9
10
11
12
13
14
15
16
17
18
19
20
21
22
23
24
25
26
27
28
29
30
31
32
33
34
35
36
37
# 2. 编写自动配置类:MyBatisAutoConfiguration
package com.etoak.spring.autoconfigure;

import org.apache.ibatis.session.SqlSessionFactory;
import org.mybatis.spring.SqlSessionFactoryBean;
import org.springframework.beans.factory.annotation.Autowired;
import org.springframework.boot.autoconfigure.AutoConfigureAfter;
import org.springframework.boot.autoconfigure.condition.ConditionalOnClass;
import org.springframework.boot.autoconfigure.condition.ConditionalOnSingleCandidate;
import org.springframework.boot.autoconfigure.jdbc.DataSourceAutoConfiguration;
import org.springframework.boot.context.properties.ConfigurationProperties;
import org.springframework.boot.context.properties.EnableConfigurationProperties;
import org.springframework.context.annotation.Bean;
import org.springframework.context.annotation.Configuration;
import org.springframework.core.io.Resource;
import org.springframework.core.io.support.PathMatchingResourcePatternResolver;
import org.springframework.core.io.support.ResourcePatternResolver;

import javax.sql.DataSource;
import java.awt.dnd.DropTarget;
import java.io.IOException;

@Configuration
// classpath下必须有这两个类型
@ConditionalOnClass({SqlSessionFactory.class, SqlSessionFactoryBean.class})
// 在本项目的Spring容器应该只有一个数据源(只连接了一个数据库)
@ConditionalOnSingleCandidate(DataSource.class)
// 在数据源自动配置完成之后进行配置MyBatis
@AutoConfigureAfter(DataSourceAutoConfiguration.class)
// application.yml配置文件中的配置项
@EnableConfigurationProperties(MyBatisProperties.class)
public class MyBatisAutoConfiguration {

	@Autowired
	DataSource dataSource;

	@Autowired
	MyBatisProperties properties;

	@Bean
	public SqlSessionFactoryBean sqlSessionFactory() throws IOException {
		System.out.println("开始配置MyBatis");
		SqlSessionFactoryBean factoryBean = new SqlSessionFactoryBean();
		factoryBean.setDataSource(this.dataSource);
		factoryBean.setTypeAliasesPackage(this.properties.getTypeAliasesPackage());

		ResourcePatternResolver resolver = new PathMatchingResourcePatternResolver();
		Resource[] resources = resolver.getResources(this.properties.getMapperLocations());
		factoryBean.setMapperLocations(resources);
		System.out.println("自动配置MyBatis结束");
		return factoryBean;
	}

}
2
3
4
5
6
7
8
9
10
11
12
13
14
15
16
17
18
19
20
21
22
23
24
25
26
27
28
29
30
31
32
33
34
35
36
37
38
39
40
41
42
43
44
45
46
47
48
49
50
51
52
53
54
# 3. 编写配置文件类:MyBatisProperties
package com.etoak.spring.autoconfigure;

import org.springframework.boot.context.properties.ConfigurationProperties;

@ConfigurationProperties(prefix = "mybatis")
public class MyBatisProperties {

	private String typeAliasesPackage;

	private String mapperLocations;

	public String getTypeAliasesPackage() {
		return typeAliasesPackage;
	}

	public void setTypeAliasesPackage(String typeAliasesPackage) {
		this.typeAliasesPackage = typeAliasesPackage;
	}

	public String getMapperLocations() {
		return mapperLocations;
	}

	public void setMapperLocations(String mapperLocations) {
		this.mapperLocations = mapperLocations;
	}
}
2
3
4
5
6
7
8
9
10
11
12
13
14
15
16
17
18
19
20
21
22
23
24
25
26
27
28
# 4. 在classpath下(src/main/resource下) 创建META-INF文件夹 在该文件夹中创建spring.factories文件
org.springframework.boot.autoconfigure.EnableAutoConfiguration=com.etoak.spring.autoconfigure.MyBatisAutoConfiguration
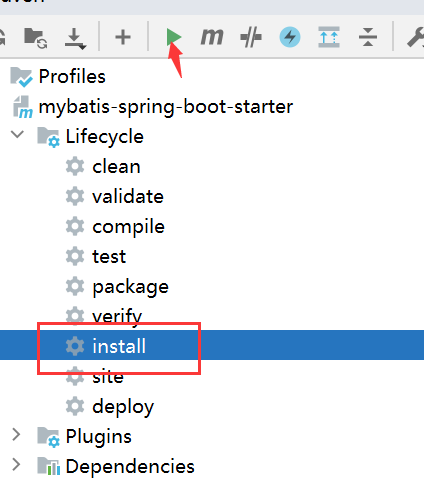
# 5. 将Starter工程安装到本地仓库 然后在工程中依赖自己创建的stater
mvn install
# 11. 整合MyBatis Plus
# 1. MyBatisPlus 的默认配置
- mapperLocations:classpath*:/mapper/**/*.xml
- map-underscore-to-camel-case:true
自动将下划线分隔字段的字段映射为Java Bean的驼峰属性.
select create_create 可以自动修改为Bean中的createTime属性
2
# 12. 图片上传
- 上传注意事项前端发送的请求方法必须是post参数类型必须是multipart/form-data Spring MVC后端需要配置MultipartResolver
- 引入Maven依赖:commons-fileupload
- 在application.yml中配置图片两个配置项图片上传目录:d:/upload/et2203图片访问地址的前缀:/pics
- 编写ImgProperties读取自定义的配置项
- 编写UploadController
img:
	dir: F:/2.picture/upload/
	prefix: /pics
2
3
package com.etoak.commons.properties;

import lombok.Data;
import org.springframework.boot.context.properties.ConfigurationProperties;

/**
 * @Description TODO
 * @Author Joyin
 * @Date 2022-07-27 09:20:00
 * @Version 1.0
 */
@Data
@ConfigurationProperties(prefix = "img")
public class ImgProperties {

    private String dir;

    private String prefix;

}
2
3
4
5
6
7
8
9
10
11
12
13
14
15
16
17
18
19
20
21
package com.etoak.commons.controller;

import cn.hutool.core.date.DateUtil;
import cn.hutool.core.img.ImgUtil;
import cn.hutool.core.util.IdUtil;
import cn.hutool.core.util.StrUtil;
import com.etoak.commons.properties.ImgProperties;
import com.etoak.commons.vo.AjaxResult;
import lombok.extern.slf4j.Slf4j;
import org.apache.commons.io.FilenameUtils;
import org.apache.commons.lang3.ObjectUtils;
import org.apache.commons.lang3.StringUtils;
import org.springframework.stereotype.Controller;
import org.springframework.web.bind.annotation.PostMapping;
import org.springframework.web.bind.annotation.RequestMapping;
import org.springframework.web.bind.annotation.ResponseBody;
import org.springframework.web.multipart.MultipartFile;

import javax.annotation.Resource;
import java.awt.*;
import java.io.File;

/**
 * @Description TODO
 * @Author Joyin
 * @Date 2022-07-27 09:05:00
 * @Version 1.0
 */
@Slf4j
@Controller
@RequestMapping("/common")
public class CommonController {

	public static final String[] IMG_SUFFIX = {"image/jpeg", "image/png"};

	@Resource
	private ImgProperties imgProperties;

	/**
     * 通用文件上传
     *
     * @param file MultipartFile文件
     * @return 结果
     */
	@ResponseBody
	@PostMapping("/upload")
	public AjaxResult<?> upload(MultipartFile file) {

		try {

			/* 文件不能为空 */
			if (ObjectUtils.isEmpty(file) || file.isEmpty()) {
				throw new Exception("文件不能为空");
			}
			/* 图片类型限制 */
			String contentType = file.getContentType();
			if (!StringUtils.equalsAny(contentType, IMG_SUFFIX)) {
				throw new Exception("图片仅支持JPG/PNG");
			}

			/* 修改文件名称 */
			String extension = FilenameUtils.getExtension(file.getOriginalFilename());
			String filename = StringUtils.join(IdUtil.simpleUUID(), StrUtil.DOT, extension);

			/* 创建上传目录 */
			String datePath = StringUtils.join(DateUtil.format(DateUtil.date(), "yyyy/MM"), StrUtil.SLASH);
			File uploadDir = new File(StringUtils.join(this.imgProperties.getDir(), datePath));
			if (!uploadDir.exists()) {
				uploadDir.mkdirs();
			}

			File destFile = new File(uploadDir, filename);

			//创建模板文件 参数1 原文件名称  目标文件名称
			File tempFile = File.createTempFile(file.getOriginalFilename(), filename);
			//将原文件写入目标文件
			file.transferTo(tempFile);

			ImgUtil.pressText(//
				tempFile,
				destFile,
				"版权所有 ETOAK", Color.WHITE,
				new Font("华文彩云", Font.BOLD, 50),
				0,
				0,
				0.8f
			);

			String prefix = imgProperties.getPrefix();

			String path = prefix.endsWith(StrUtil.SLASH) ?
				StringUtils.join(prefix, datePath, filename) :
			StringUtils.join(prefix, StrUtil.SLASH, datePath, filename);

			return AjaxResult.success(path);

		} catch (Exception e) {
			log.error(e.getMessage(), e);
			return AjaxResult.failed(e.getMessage());
		}
	}


}
2
3
4
5
6
7
8
9
10
11
12
13
14
15
16
17
18
19
20
21
22
23
24
25
26
27
28
29
30
31
32
33
34
35
36
37
38
39
40
41
42
43
44
45
46
47
48
49
50
51
52
53
54
55
56
57
58
59
60
61
62
63
64
65
66
67
68
69
70
71
72
73
74
75
76
77
78
79
80
81
82
83
84
85
86
87
88
89
90
91
92
93
94
95
96
97
98
99
100
101
102
103
104
105
# 13. SpringBoot处理静态资源
# 1. Spring MVC处理静态资源
- <mvc:default-servlet-handler />
实现WebMvcConfigurer接口的configureDefaultServletHandling()方法
- <mvc:resources mapping="" location="" />
实现WebMvcConfigurer接口的addResourceHandlers()方法
# 2. Spring Boot默认处理静态资源的方式
- 访问路径:/webjar/**,访问位置:classpath:META-INF/resources/webjars
addResourceHandler(registry, "/webjars/**", "classpath:/META-INF/resources/webjars/");
- 访问路径:/**,访问位置:有4个
classpath:/META-INF/resources/ classpath:/resources/ classpath:/static/ classpath:/public/
# 2.3 在Spring Boot中定制静态资源的请求路径和静态资源位置
- 实现WebMvcConfigurer接口的addResourceHandlers()方法@Configuration
public class MvcConfig implements WebMvcConfigurer {

	/**
   * <mvc:resources mapping="/pics/**" location="file:d:/upload/et2203/" />
   */
	@Override
	public void addResourceHandlers(ResourceHandlerRegistry registry) {
		registry.addResourceHandler("/pics/**")
			.addResourceLocations("file:d:/upload/et2203/");
	}
}
2
3
4
5
6
7
8
9
10
11
# 14. SpringBoot 配置过滤器
@Bean
public FilterRegistrationBean<CrossFilter> crossFilter() {
	FilterRegistrationBean<CrossFilter> registrationBean =
		new FilterRegistrationBean<>();
	registrationBean.setFilter(new CrossFilter());
	registrationBean.addUrlPatterns("/*");
	registrationBean.setOrder(-1);
	return registrationBean;
}
2
3
4
5
6
7
8
9
package com.etoak.commons.filter;

import lombok.extern.slf4j.Slf4j;

import javax.servlet.*;
import javax.servlet.http.HttpServletRequest;
import javax.servlet.http.HttpServletResponse;
import java.io.IOException;

/**
 * @Description 跨域处理
 * @Author joyin
 * @Date 2022-07-03 17:29:00
 * @Version 1.0
 */
@Slf4j
public class CrossFilter implements Filter {
	@Override
	public void init(FilterConfig filterConfig) {

	}

	@Override
	public void doFilter(ServletRequest servletRequest, ServletResponse servletResponse, FilterChain chain) throws IOException, ServletException {
		servletRequest.setCharacterEncoding("utf-8");
		servletResponse.setContentType("application/json;charset=utf-8");
		HttpServletRequest httpRequest = (HttpServletRequest) servletRequest;
		HttpServletResponse httpResponse = (HttpServletResponse) servletResponse;

		// 允许所有的请求域名访问我们的跨域资源,可以固定单个或者多个内容
		httpResponse.setHeader("Access-Control-Allow-Origin", "*");
		// httpResponse.setHeader("Access-Control-Allow-Origin", "http://localhost:9090");// 允许所有的请求域名访问我们的跨域资源,可以固定单个或者多个内容
		// 允许何种请求方法访问该跨域资源服务器
		httpResponse.setHeader("Access-Control-Allow-Methods", "POST, GET, OPTIONS, DELETE,PUT");
		// 预检请求的有效期,单位为秒。有效期内,不会重复发送预检请求
		httpResponse.setHeader("Access-Control-Max-Age", "3600");
		// 允许所有的请求header访问,可以自定义设置任意请求头信息 后期加上 authorization
		// 请求里的头
		httpResponse.addHeader("Access-Control-Allow-Headers",
							   "token,authorization,access-token,Accept,Origin, No-Cache, X-Requested-With, If-Modified-Since, Pragma, Last-Modified, Cache-Control, Expires, Content-Type, X-E4M-With");
		// 是否允许用户发送、处理cookie
		httpResponse.setHeader("Access-Control-Allow-Credentials", "true");
		// 如果额外设置自己的头需要在这定义
		// 响应里的头
		httpResponse.setHeader("Access-Control-Expose-Headers", "token,authorization,access-token");

		chain.doFilter(httpRequest, httpResponse);
	}

	@Override
	public void destroy() {
	}
}
2
3
4
5
6
7
8
9
10
11
12
13
14
15
16
17
18
19
20
21
22
23
24
25
26
27
28
29
30
31
32
33
34
35
36
37
38
39
40
41
42
43
44
45
46
47
48
49
50
51
52
53
54